
For families in our service areas
For families in our service areas, this guide explains caregiver support and how non-medical in-home caregiving can support care planning in East Idaho, Treasure Valley & Magic Valley, Northern Wasatch, North Central West Virginia, and Northeast Ohio.
What You Need to Know About Successful Home Ramp Installation
Ensuring safe and accessible mobility for seniors and individuals with disabilities presents a significant challenge for caregivers. This issue not only affects the independence of those in need but also raises the risk of falls, which can lead to serious injuries. Caregivers must navigate the complexities of various ramp types and the specific needs of individuals requiring assistance.
To address these challenges, caregivers can take several steps to create secure environments that promote independence:
- Understanding the different types of ramps available is crucial. From portable ramps to permanent installations, each option serves unique needs.
- Caregivers should assess the home environment to identify potential hazards and determine the best ramp solution.
By transforming their homes into safe spaces, caregivers can significantly reduce the risk of falls and enhance mobility for seniors and individuals with disabilities. Practical solutions include:
- Consulting with experts
- Utilizing resources for ramp installation
- Continuously educating themselves on best practices in caregiving
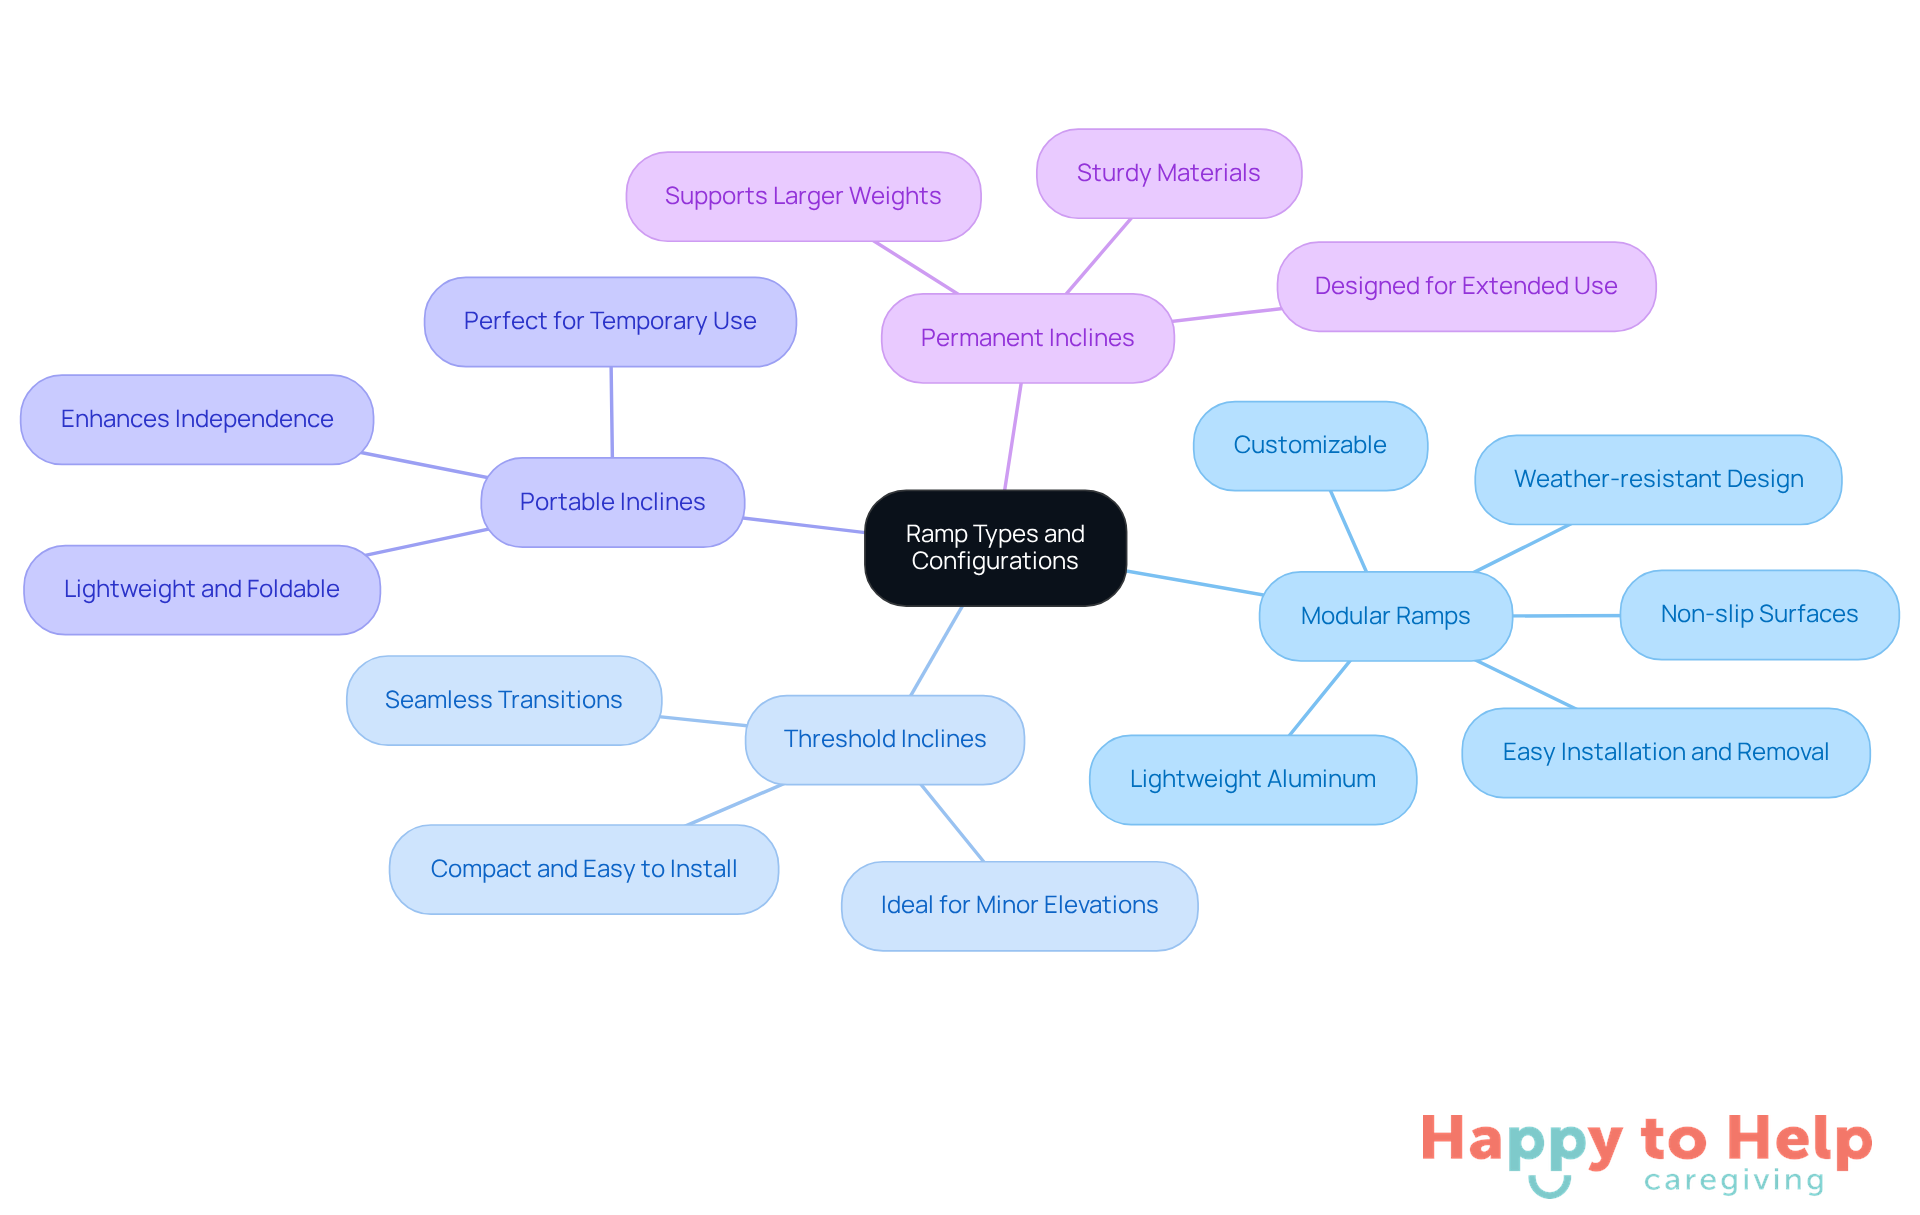
Understand Ramp Types and Configurations
Before starting the installation process, it's crucial to understand the various types of ramps available, each designed to meet specific needs:
Problem: Caregivers often face challenges in ensuring safe and accessible mobility for seniors and individuals with disabilities.
Agitate: These mobility challenges can lead to increased risks of falls and hinder independence, making it essential to find effective solutions that cater to specific needs.
Solution: Here are the types of ramps that can help:
-
Modular Ramps: Highly customizable, these ramps allow for adjustments to fit different configurations. Typically constructed from lightweight aluminum, they are easy to install and remove, making them ideal for both temporary and long-term use. Modular inclines are especially preferred by caregivers, with nearly 80% of seniors choosing to age in place instead of moving to assisted living facilities, highlighting the significance of adaptable solutions. Additionally, these inclines feature non-slip surfaces and weather-resistant designs, ensuring safety and durability in various conditions.
-
Threshold Inclines: Ideal for minor elevations, threshold inclines promote seamless transitions between surfaces, such as from a doorway to the ground. They are compact and easy to install, making them suitable for various home care settings where home ramp installation is needed for minor elevation changes.
-
Portable Inclines: Crafted for ease, these lightweight and foldable structures are perfect for temporary usage or for individuals who travel often. Their portability allows caregivers to provide mobility assistance in diverse environments, enhancing independence.
-
Permanent Inclines: Built from sturdy materials such as wood or concrete, permanent inclines are designed for extended use and can bear larger weights. They are a solid choice for individuals requiring consistent access to their homes.
Grasping these options will enable you to choose the appropriate incline for home ramp installation that corresponds with the particular requirements of the person needing support, ensuring safety and accessibility in their living environment. For tailored assistance, consider utilizing complimentary site assessments provided by access companies, which can help guarantee the best match for your residence.
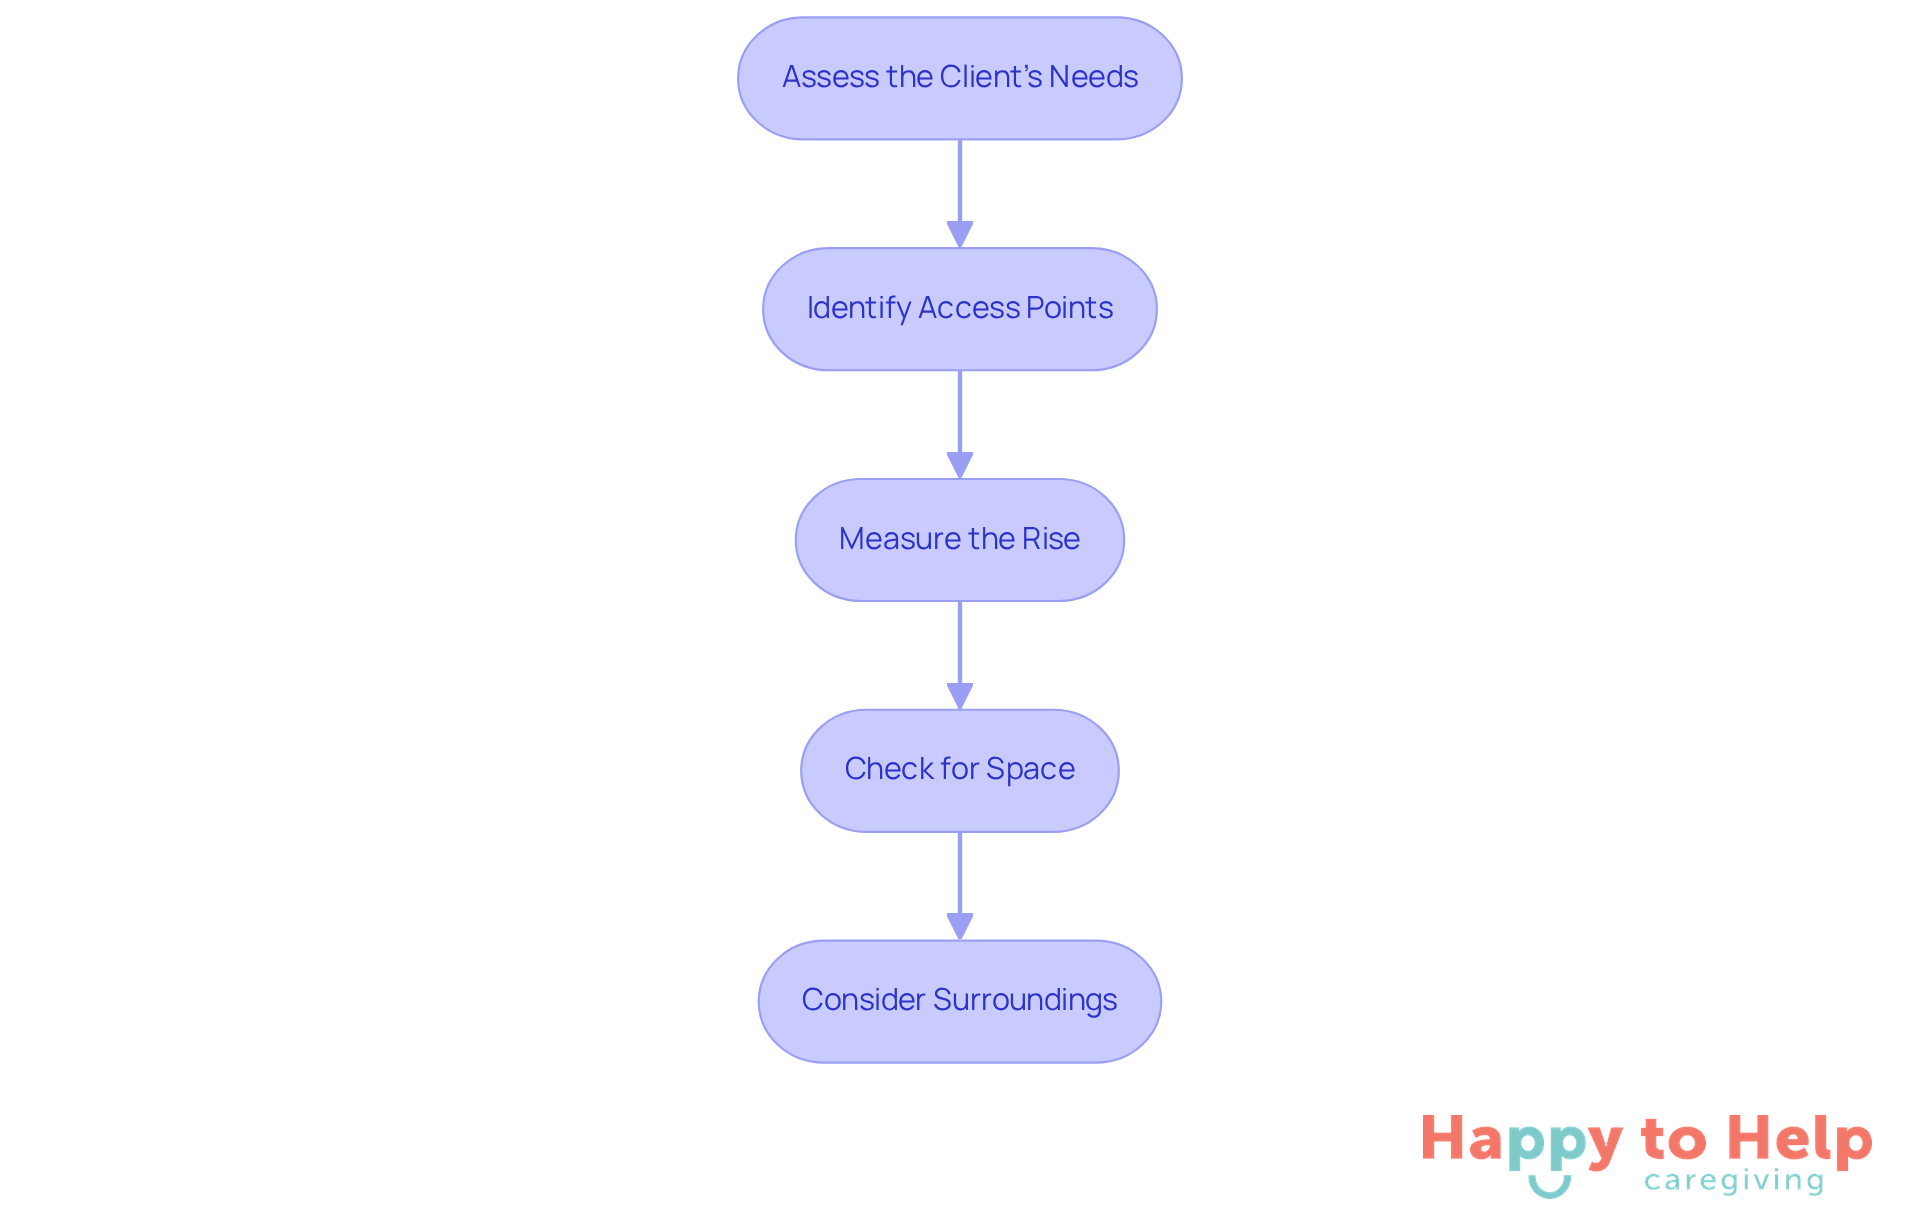
Prepare for Installation: Assess Needs and Measure Space
To prepare for the home ramp installation, it's crucial to address the accessibility needs of individuals with mobility challenges. Without proper planning, caregivers may face difficulties in ensuring safe and effective access to homes.
-
Assess the Client's Needs: Start by determining the mobility level of the person who will utilize the incline. Consider their wheelchair or mobility device size and weight to ensure a suitable fit.
-
Identify Access Points: Next, pinpoint where the incline will be set up. Common locations include front or back doors, garages, or patios, each presenting unique challenges.
-
Measure the Rise: Measure the vertical distance from the ground to the entry point of the home. This measurement is essential for establishing the length required for the incline, ensuring it meets safety standards.
-
Check for Space: Ensure there is enough horizontal space for the incline. A general guideline is a 1:12 slope ratio, meaning for every inch of rise, there should be at least 12 inches of length. This ratio is vital for safe navigation.
-
Consider Surroundings: Finally, look for any obstacles that may hinder the setup of the inclined plane, such as landscaping, steps, or other structures. Addressing these factors will help create a smooth installation process.
By completing these assessments, caregivers will be well-prepared for the home ramp installation process, ensuring that individuals with mobility challenges can access their homes safely and effectively.
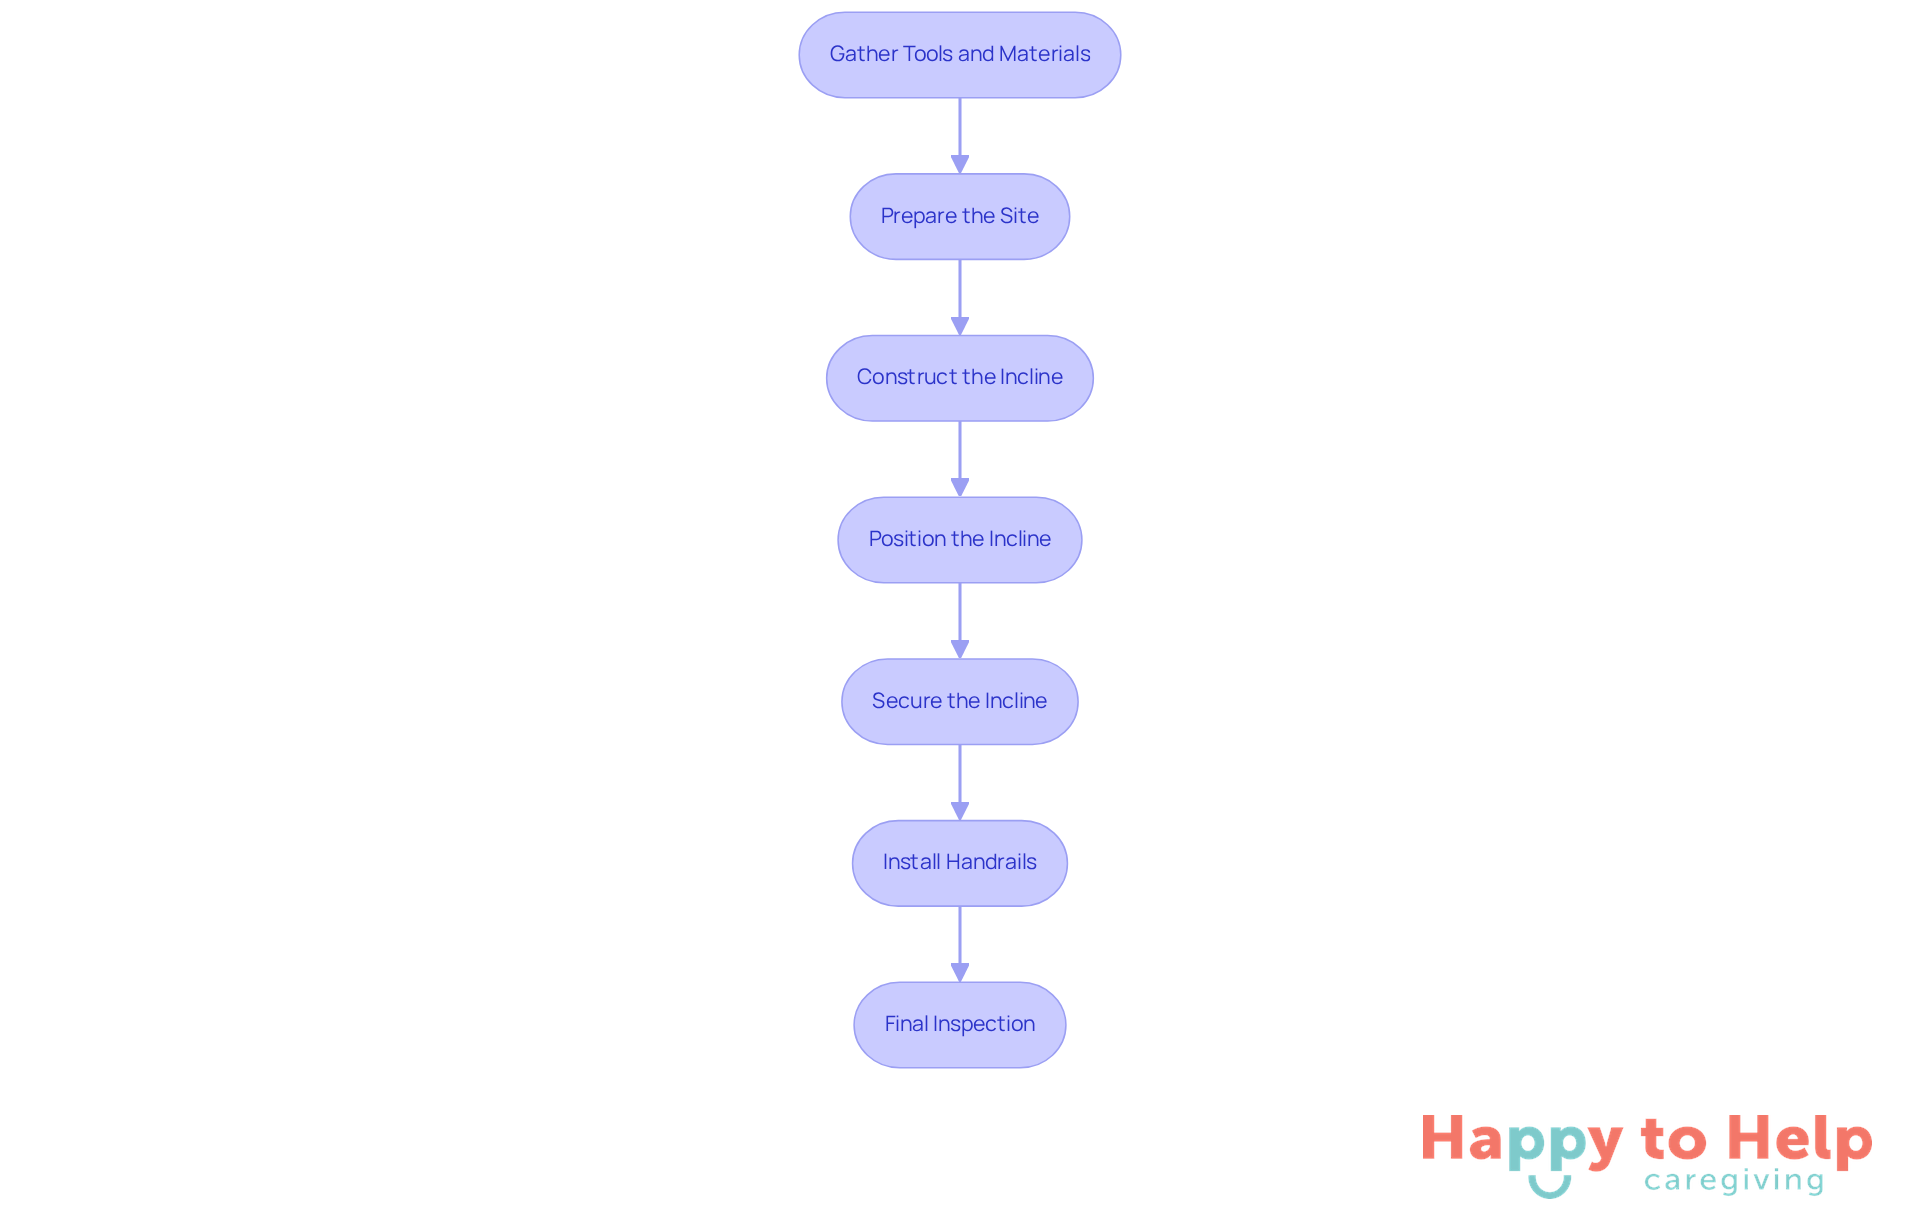
Execute the Installation: Step-by-Step Instructions
Installing a wheelchair ramp is crucial for ensuring access for individuals with mobility challenges. Without proper access, caregivers face significant difficulties in providing support and assistance. This guide outlines the steps for home ramp installation, ensuring the process is straightforward and efficient.
-
Gather Tools and Materials: Start by collecting all necessary tools, including a level, drill, screws, measuring tape, and safety gear like gloves and goggles. Ensure you have electrical access for power tools, as this is essential for a smooth setup process.
-
Prepare the Site: Clear the setup area of any debris, furniture, or obstacles that could hinder the ramp's arrangement. Make sure the ground is level and accessible, creating a safe working environment. Remember to secure pets indoors or away from the work zone during installation.
-
Construct the Incline: If using a modular structure, carefully follow the manufacturer's instructions to assemble the sections. Ensure that all components are securely connected, as this is vital for the structure's stability and safety. Take multiple measurements during assembly to ensure accuracy.
-
Position the Incline: Place the assembled incline at the designated access point, ensuring it is level and stable. Use a level to verify that the incline is properly aligned, which is essential for safe usage.
-
Secure the Incline: If necessary, anchor the incline to the ground or structure using appropriate fasteners. This step is crucial to prevent any movement during use, ensuring the incline remains securely in position.
-
Install Handrails: If the design of the slope includes handrails, install them according to the manufacturer's guidelines. Handrails should be placed at a convenient height for users, improving security and accessibility.
-
Final Inspection: Conduct a detailed examination of the installed incline to confirm everything is stable and adheres to compliance regulations. Verify the final slope to ensure it meets safety guidelines. Test the incline by walking up and down to check for stability and make any necessary adjustments.
By following these steps, you will ensure a secure and efficient home ramp installation, which provides vital access for individuals with mobility challenges. Additionally, consider exploring financial assistance options through programs like Pennsylvania’s Renovate & Repair Program to help with expenses related to the installation of access structures.
Maintain Safety and Functionality: Post-Installation Care
To ensure the safety and effectiveness of your recently installed incline, regular maintenance is essential. Neglecting upkeep can lead to serious safety hazards and decreased functionality, impacting the quality of life for those who rely on it. Here are key steps caregivers can take to maintain the incline:
-
Regular Inspections: Monthly inspections are crucial to identify any signs of wear, damage, or instability. Look for loose screws, cracks, or rust, as these can compromise safety. Experts recommend that aluminum inclines be inspected at least once every three months, with monthly evaluations for those exposed to severe weather. As Eric Rubel states, "Routine maintenance helps prevent accidents and extends the lifespan of a wheelchair access structure."
-
Clean the Incline: Keeping the incline surface clean is vital. Regularly sweep away debris and use a hose to wash off dirt. This practice not only prevents slips but also maintains the structure's integrity. Opt for mild, non-abrasive household cleaners to avoid damaging the surface. Regular cleaning is essential, as accumulated moisture and debris can create hazardous conditions.
-
Check for Obstructions: Ensure the sloped area remains clear of obstacles like leaves, snow, or garden tools. An unobstructed path is vital for safe navigation, especially during inclement weather. Clutter can lead to slips, trips, or even structural failures, increasing the risk of injuries.
-
Test Stability: Periodically evaluate the incline's stability by walking up and down it. Ensure it feels secure and does not wobble. Regular stability checks help detect potential issues early, reducing the risk of accidents.
-
Address Issues Promptly: If any problems arise during inspections, address them immediately to prevent accidents. This may involve tightening screws, replacing damaged parts, or consulting a professional for repairs. Timely assistance can greatly decrease the chances of severe injuries, as a faulty incline can lead to slips, trips, or structural failures.
By following these maintenance tips, caregivers can ensure that the home ramp installation remains a safe and effective solution for mobility, ultimately enhancing the quality of life for those who depend on it.

Your Path Forward
Understanding the challenges of home ramp installation is crucial for caregivers aiming to improve accessibility for individuals with mobility issues. Without proper ramps, these individuals may face significant barriers in their daily lives, limiting their independence and safety.
To address this problem, caregivers must recognize the various types of ramps available, from modular to permanent structures. By selecting the most suitable option that meets their clients' specific needs, caregivers can ensure safety and promote independence.
Key steps for successful ramp installation include:
- Assessing individual needs
- Measuring space accurately
- Executing the installation with precision
- Maintaining the ramp for ongoing safety and functionality
Each of these phases is vital in creating a seamless transition for users, fostering a secure environment that enhances their quality of life.
In conclusion, the significance of proper home ramp installation cannot be overstated. Caregivers are encouraged to take proactive measures in planning, executing, and maintaining these installations to ensure they effectively serve their intended purpose. By investing time and effort into this process, caregivers not only improve mobility but also empower individuals to navigate their homes with confidence and dignity. Embracing these practices can lead to a more inclusive and accessible living environment for all.
https://iframe.tely.ai/cta/eyJhcnRpY2xlX2lkIjogIjY5NDBhMjNkMjI1ZjA3N2M1ZmMwYmY1ZCIsICJjb21wYW55X2lkIjogIjY4ZWU1ZGNhNzMxNzYyNTU3ZjNjOTVjMSIsICJpbmRleCI6IG51bGwsICJ0eXBlIjogImFydGljbGUifQ==Frequently Asked Questions
What are the main types of ramps available for mobility assistance?
The main types of ramps include Modular Ramps, Threshold Inclines, Portable Inclines, and Permanent Inclines, each designed to meet specific mobility needs.
What are Modular Ramps and their benefits?
Modular Ramps are highly customizable ramps made from lightweight aluminum, allowing for adjustments to fit different configurations. They are easy to install and remove, ideal for both temporary and long-term use, featuring non-slip surfaces and weather-resistant designs for safety and durability.
When should Threshold Inclines be used?
Threshold Inclines are ideal for minor elevations, facilitating seamless transitions between surfaces, such as from a doorway to the ground. They are compact and easy to install, suitable for various home care settings.
What are the characteristics of Portable Inclines?
Portable Inclines are lightweight and foldable, designed for temporary usage or for individuals who travel frequently. Their portability allows caregivers to assist with mobility in different environments.
What are Permanent Inclines and their advantages?
Permanent Inclines are constructed from sturdy materials like wood or concrete, designed for extended use. They can bear larger weights and are a solid choice for individuals needing consistent access to their homes.
How can I choose the appropriate ramp for my needs?
Understanding the different types of ramps will help you select the appropriate incline for home ramp installation that meets the specific requirements of the person needing support, ensuring safety and accessibility.
Is there assistance available for selecting the right ramp?
Yes, consider utilizing complimentary site assessments provided by access companies to help ensure the best match for your residence.
List of Sources
- Understand Ramp Types and Configurations
- Why Modular Wheelchair Ramps Are the Smart, Safe Choice for Your Home or Business — Elev8 Mobility (https://elev8mobility.com/news-insights-blog/why-modular-wheelchair-ramps-are-the-smart-safe-choice-for-your-home-or-business)
- Choosing the Best Portable Wheelchair Ramps | Breaking AC (https://breakingac.com/news/2025/oct/03/choosing-the-best-portable-wheelchair-ramps)
- The Future of Modular Wheelchair Ramps - Ramps Plus (https://rampsplus.ie/2025/01/20/modular-wheelchair-ramps)
- Residential Ramps Market, Global Outlook and Forecast 2025-2032 (https://statsmarketresearch.com/global-residential-ramps-forecast-2025-2032-301-8055062)
- New Year, New Goals: Making Your Home More Accessible in 2025 (https://mobilityworks.com/blog/new-year-new-goals-making-your-home-more-accessible-in-2025)
- Prepare for Installation: Assess Needs and Measure Space
- Is a Ramp Right for You? (https://greenlightmobility.com/news/is-a-ramp-right-for-you)
- How to Choose a Wheelchair Ramp For Your Driveway or Garage (https://homeaccess.nationalramp.com/news/choosing-an-access-ramp-for-driveway-or-garage)
- ADA Ramp Requirements & Residential Code | National Ramp (https://homeaccess.nationalramp.com/resource/education/ada-ramp-guidelines)
- How to prepare your home for a wheelchair ramp installation (https://kiro7.com/contributor/how-prepare-your/7JH6HPR3T43BXCEU5F44EI5XBM)
- Make Your Home ADA Friendly: Easy Accessibility Tips (https://homeaccess.nationalramp.com/news/how-to-make-your-home-ada-friendly)
- Execute the Installation: Step-by-Step Instructions
- Wheelchair Ramp FAQs: Costs, ADA Codes, and Install Options (https://corfreedom.com/2023/08/01/wheelchair-ramps-questions)
- Wheelchair Ramp Installation | Lifeway Mobility (https://lifewaymobility.com/resources/product-guides/wheelchair-ramp-installation)
- What to Expect During a Wheelchair Ramp Installation in Lancaster, PA - Pennsylvania (https://lancaster.yourihs.com/what-to-expect-during-wheelchair-ramp-installation-lancaster-pa)
- Maintain Safety and Functionality: Post-Installation Care
- The Importance of Regular Ramp Maintenance (https://duraramp.com/blog/the-importance-of-regular-ramp-maintenance)
- Ramp Safety Maintenance: What to Check Regularly - BEK Medical (https://bekmedical.com/ramp-safety-maintenance-what-to-check-regularly?srsltid=AfmBOopOmNuWuLQ3-2ROGtcoYrO8iF6DL0Lung9ROxrJJ5UsSlWoQ9lZ)
- What Maintenance Does a Wheelchair Ramp Need to Ensure Safety and Accessibility? (https://insights.made-in-china.com/What-Maintenance-Does-a-Wheelchair-Ramp-Need-to-Ensure-Safety-and-Accessibility\_eaDGpOWlJniI.html)
- Winter Maintenance Tips for Wheelchair Ramps & Installation (https://lifewaymobility.com/blog/wheelchair-ramps-winter-installation-and-tips)
- Tips for Maintaining Ramps and Other Accessibility Solutions (https://ezaccess.com/blogs/main-blog/tips-for-maintaining-accessibility-solutions?srsltid=AfmBOoofiGUcPoHadS32XCHXjPozJBBVBSQQthaNTswGQ1MXPCsrj0JG)